Beginning with Moodle
How to change course format?
- In order to change a course’s format (eg. from Weekly to Topic-based), “Edit settings” button should be clicked in the administration panel after logging into the Moodle system (Figure 1). Administration panel is located at the left bottom corner of the page.

Figure 1 - Then, course format can be changed from “Course format” section of “Edit course settings” page (Figure 2).

Figure 2 - After the desired format is selected, “Save changes” button which is located at the bottom of the page should be clicked (Figure 3).

Figure 3
------------------------------------------------------------------------
Watch Video Tutorial

How to make a course visible to students?
- In order to make a course visible to students, “Edit settings” button should be clicked in the administration panel after logging into the Moodle system (Figure 1). Administration panel is located at the left bottom corner of the page.

Figure 1 - Then, "Visible" section can be changed from “Hide” to “Show” (Figure 2).

Figure 2 - After that, “Save changes” button which is located at the bottom of the page should be clicked (Figure 3).

Figure 3
------------------------------------------------------------------------
Watch Video Tutorial

How to upload a file to a Moodle course?
- In order to activate editing tools, “Turn editing on” should be selected in the administration panel after logging into the Moodle system (Figure 1). Administration panel is located on the left bottom corner of the page.

Figure 1 - At the course page, “+ Add an activity or resource” link that is on the top of the page should be clicked.Link on top of the page

Figure 2Link that is at the bottom of the related subject.
Figure 3 - Then, “File” that is on the left side of the pop-up page and under the “RESOURCES” part should be clicked.

Figure 4 - On the pop-up page, attributes of file can be edited. “Name”, “Description” and “Content” fields are necessary to fill.

Figure 5
------------------------------------------------------------------------
Watch Video Tutorial

How to restore archived courses?
- First go to arsiv-moodle.boun.edu.tr. ( Figure 1 )

Figure 1 - In order to login you need to use your BOUN email username which is the part before ‘@’ character of your email address and BOUN email password. Be sure you did not use your registration password in the password field. ( Figure 2 )

Figure 2 - Your backups will be listed. Click the backup you want to recover. ( Figure 3 )

Figure 3 - Three oprions will be listed. Read the instructions below every option. ( Figure 4 )

Figure 4 - If you selected option three go to your course page you want to restore on moodle.boun.edu.tr ( Figure 5 )

Figure 5 - On the Administration menu click “Edit Settings”. ( Figure 6 )

Figure 6 - Under “Files and uploads” select “Maximum upload size” as “Site upload limit (8MB)” and click “Save and Display”. ( Figure 7 )

Figure 7 - On the Administration menu click “Restore”. ( Figure 8 )

Figure 8 - Select the .mbz file you dowloaded from arsiv-moodle.boun.edu.tr and click “Restore” button. ( Figure 9 )

Figure 9
How to share items between courses?
- In order to activate editing tools, “Turn editing on” should be selected in the administration panel after logging into the Moodle system (Figure 1). Administration panel is located on the left bottom corner of the page.

Figure 1 - First, you need to add Sharing Cart blocks to all courses that you want to share items between. Sharing Cart block can be added from Add A Block section below the Administration block. ( Figure 2 )

Figure 2 - After adding Sharing Cart block to a course, you can add course items to the cart by clicking "Edit" on the desired course item and selecting "Copy to Sharing Cart". ( Figure 3 )

Figure 3 - On the desired course page that you want to copy items to, click on the "Copy to Course" button from Sharing Cart block to add items to the course. ( Figure 4 )

Figure 4 - You will see many dotted boxes appear in the center column. Choose the location you wish to place your item, and it will be copied there directly. ( Figure 5 )

Figure 5
How to import a course?
- By clicking the “Import” button, which is located under “Administration” menu (Figure 4), data transfer section will appear.

Figure 4 - In the “Import” page (Figure 5), current courses of the system are listed. After selecting the related radio button, which is located near to the title of the course to be imported, and clicking “Continue” button, a page that consists sections of the course to be selected (“Backup settings” page) will appear.

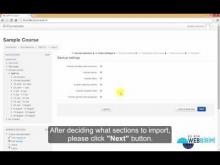
Figure 5 - “Backup settings” page (Figure 6) shows areas of a course to be imported. After marking the sections that are to be imported in the previous (5th) step, “Next” button is clicked and other copying options will appear.

Figure 6 - After marking the sections that are to be imported of a certain course, “Next” button is clicked and a page (Figure 7) that contains information about the sections to be imported will appear.

Figure 7 - After completing these steps, a review page that contains information about the course (showing which sections will be imported and which will not) will appear. After confirming this information, “Perform import” button is clicked and the last step is completed (Figure 8).

Figure 8 - The message that is indicated in Figure 9 tells that the process is completed successfully.

Figure 9 - The data of a past course is now imported to a current and is ready to be used.

Figure 10
------------------------------------------------------------------------
Watch Video Tutorial
How to merge different sections of a course?
Instructors who teach more than one sections of the same course can request to merge these sections on Moodle by contacting Registrar's Office. After merge process is completed, all of these students who are enroled to these sections are enroled into each section on Moodle. Instructors can set visible one of the sections and start using it.
How to increase file size upload limit?
How to increase moodle course restoration upload size?
You can increase moodle course restoration upload size up to 64 MB by selecting the "Site upload limit (8MB)" option in the "Files & uploads" section of the "Edit course settings" page.


How to add an assignment?
- In order to activate editing tools, “Turn editing on” should be selected in the administration panel after logging into the Moodle system (Figure 1). Administration panel is located on the left bottom corner of the page.

Figure 1 - “+ Add an activity or resource” link, which is located on top of the page of the course or below the related week or topic is selected (Figure 2 and Figure 3).Link on top of the page

Figure 2Link below of a topic
Figure 3PS: If no date is specified for the assignment, link on top of the page may be used.
- “Assignment” link, which is located on the left side of the opening window (Figure 4), is selected and “Add” button is clicked.

Figure 4 - In the page that has just opened, assignment details such as assignment date, submission types etc. are filled and by clicking “Save and display” button, the assignment is created.

Figure 5
------------------------------------------------------------------------
Watch Video Tutorial

